Tile grout: what it is, how to choose and apply it correctly
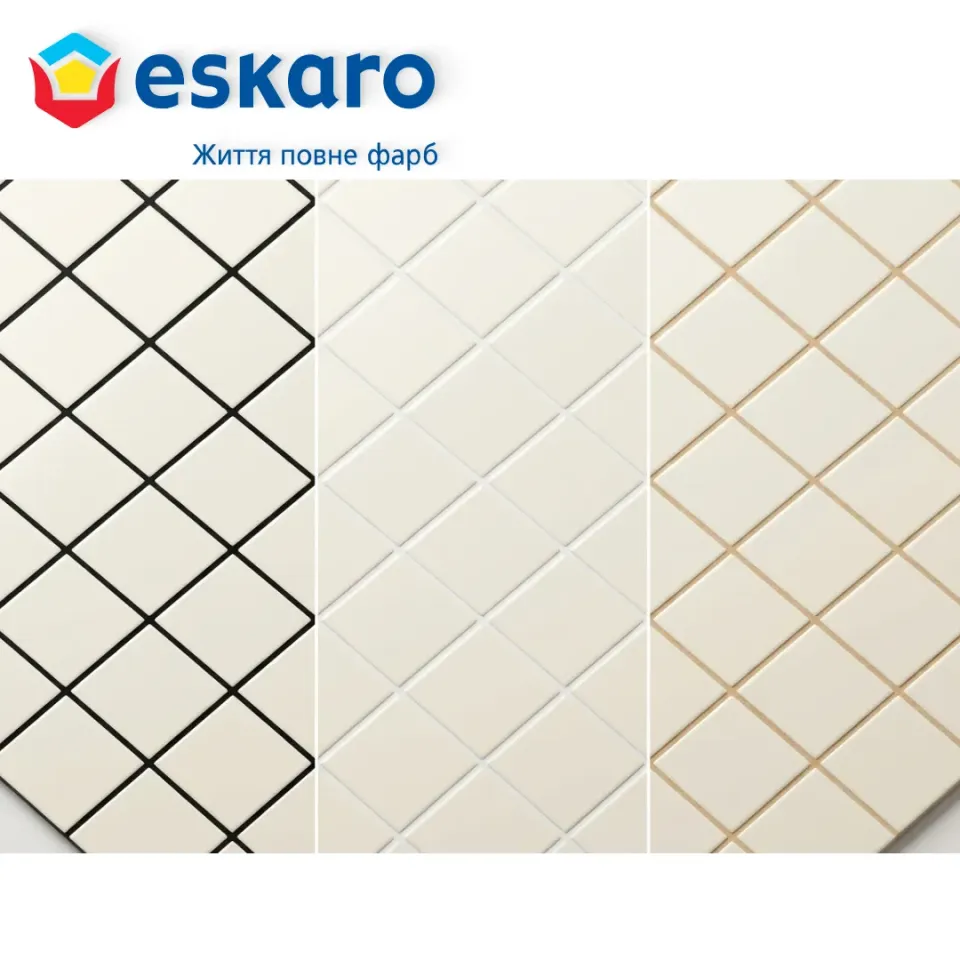
The grout is an integral part of high-quality cladding. Often it is it that determines not only the durability of the coating, but also the final aesthetic result. To understand how much the grout affects the design, imagine the same ivory-colored tile. If you choose a black grout for it, you will get a clear graphic geometry, a white grout will create the effect of a solid canvas, and a beige one will add softness and comfort. The same material with a different grout looks completely different.
An incorrectly selected or applied grout may begin to crumble or wash out over time. In this case, you will need to repair the joints - a laborious and painstaking process.
*Read about how to properly remove the old grout and update the joints at the end of this article.
What is a grout
A grout is a special mortar used to fill the joints between tiles. It performs several important functions:
fills the joints, protecting the base from water and dirt;
“encapsulates” the surface, making it easier to clean the room and creating a clear seam line (it is usually slightly recessed relative to the plane of the tile, and not flush with it);
adds aesthetics to the design of the tile;
compensates for thermal expansion, leveling micromovements of the coating during temperature changes;
creates a monolithic coating, binding the entire finishing surface into a single strong shield.
The main components of the grout
Modern grouts consist of:
cement or polymers that provide strength;
sand and other fillers for proper filling of the joints;
special additives - for flexibility, water repellency and resistance to dirt;
dyes - to match the color to the tile.
How to choose the right grout
1. By type of material
Grouches are:
Cement - universal, for bathrooms, kitchens and corridors.
Epoxy - extremely durable and completely waterproof. They are ideal not only for swimming pools or production areas, but also for kitchens and bathrooms, where resistance to stains and fungus is important. For example, the DUAX EPOXY epoxy grout provides maximum protection and durability in any conditions.
Polymeric - flexible and resistant to temperature changes, great for facades, open terraces, as well as for interior work in residential premises with increased load.
2. By color
The color of the grout significantly affects the perception of the interior:
light colors visually expand the space;
dark colors are practical for floors;
accent colors add character to the design.
Practical tips for application
Surface preparation
Before applying the grout, make sure that:
the tile is securely fixed;
if the surface was covered with waterproofing, then at least 7 days have passed since the surface was covered;
the seams are clean, free of dust and glue residues;
the surface is dry, and the air and base temperature are above +5°C.
Application
Prepare the mixture according to the manufacturer's recommendations on the packaging (the composition and proportions may vary significantly even in different products of the same brand).
Apply the grout with a rubber spatula at an angle of 45° to the seam line.
Carefully fill the seams to the entire thickness of the tile.
Form the joints using a special spatula or a piece of cable.
Remove excess material and wipe the surface with a damp sponge for final leveling.
Important: forming recesses is carried out immediately after filling the joints; after hardening it is too late to do this.
For some types of cement joints, it is recommended to moisten the joints with water 2–3 times during the first day after application.
Drying time
The complete drying time is individual for each product, so be sure to read the instructions on the packaging.
Approximate times:
Cement and polymer joints: 12–24 hours.
Epoxy joints: 1–2 hours before the start of primary hardening.
Avoid contact with water until the drying process is complete.
Common mistakes when working with grout
Common mistakes when working with grout
Incorrect mixing: adding water or hardener “by eye” and not according to the manufacturer’s recommendations;
applying grout immediately after laying tiles;
applying grout to a damp base;
using grout that does not match the width and depth of the joint;
uneven filling of joints.
Correct adherence to technology helps to avoid cracks, reduce the risk of mold and ensure the durability of the coating.
Choosing a grout is easy
On the EskaroShop website you will find a wide selection of grouts of different types and colors that can satisfy the wishes of the designer and the needs of the customer. Each product card indicates the consumption parameters, recommended joint width, drying time and application tips.
Tip: to achieve the perfect result, always choose a grout according to the type of tile and operating conditions.
Types of grout: cement VS epoxy
1. Cement grout (Kiilto)
Composition: cement + sand + polymer additives + pigments
Advantages:
Easy to apply (even a beginner can handle it)
Quickly sets
Wide color palette (30 shades)
Easy to correct mistakes
Where to use:
Residential premises (kitchens, bathrooms, toilets)
Offices, shopping centers
Shower cabins (with mandatory finishing)
Popular colors:
Kiilto 10 (white)
Kiilto 50 (black)
Kiilto 40 (gray)
For this type of grout, it is recommended to additionally use moisture-resistant joint protection, for example, Lotus Effekt, which provides maximum resistance to water and dirt, or Fixtur.
2. Epoxy grout (DUAX EPOXY)
Composition: epoxy resin + hardener + fillers
Advantages:
100% waterproof (does not absorb water at all!)
Absolute resistance to chemicals
Not afraid of fungus and mold
Can be washed with aggressive detergents
Where to use:
Epoxy grout is characterized by increased strength, water resistance and chemical resistance. That is why it is often used in rooms with increased load or high humidity.
It can be used in:
residential premises
bathrooms and toilets
kitchens
shower areas
swimming pools
public and commercial premises (cafes, restaurants, shopping malls)
After complete hardening, the epoxy grout forms a dense polymer seam that does not absorb water, does not accumulate dirt and is resistant to household chemicals, therefore it is safe to use in residential interiors.
Popular colors:
Duax Epoxy No. 210 (white)
Duax Epoxy No. 250 (black)
Duax Epoxy No. 231 (light brown)
residential premises, offices, dry and moderately humid areas
residential premises, kitchens, bathrooms, showers, swimming pools, commercial premises
Repair of joints: how to remove old grout
Repair of inter-tile joints is still a "pleasure", so it is better to do everything qualitatively right away. But if the joint is damaged or affected by fungus, it must be replaced.
Stages of removing old grout:
Preparation. Protect the edges of the tile with masking tape so as not to damage the glaze during mechanical work.
Mechanical removal.
For cement joints - use a special joint spreader (a knife with a special coating). Carefully cut the joint to the full depth.
For epoxy joints - since the epoxy joint after hardening is more like a solid polymer in structure (similar to plastic), its mechanical removal can be difficult. For cleaning, it is recommended to use special acid-based products, such as Duax Epoxy Cleaner 0.5 l (be sure to read the manufacturer's instructions before use). Also, in some cases, you can use a construction hair dryer to gently warm the joint. Under the influence of hot air, the material partially softens, after which it can be carefully removed with a narrow spatula.
Cleaning. Carefully remove the remains of dust and small particles with a vacuum cleaner.
Antiseptic treatment. If the cause of the repair was mold, be sure to treat the empty joint with the fungicidal agent Eskaro Biotol Spray.
Applying a new grout. After the antiseptic has completely dried, fill the joints using the standard technology described above.
Tip: If you want to avoid re-repair, choose DUAX EPOXY epoxy grout for areas with high humidity or use Lotus Effekt protective impregnation for Fixtur cement mixtures
Duax Silicone silicone sealant: an essential element for sealing joints
In addition to cement and epoxy grout, another important material is used in tile work - silicone sealant. It is not used to fill standard inter-tile joints, but for deformation and adjacency zones, where micromovements of structures are possible.
In such places, rigid materials such as cement or epoxy grout can crack or peel off over time, so elastic silicone is used for sealing.
Where silicone sealant is a must
Inner corners (wall-to-wall joints)
Floor-to-wall joints
Areas around shower drains
Places around water outlets and plumbing outlets
Tile joints around a bathtub, shower tray or sink
That is why it is almost impossible to properly fill joints in a bathroom without using silicone sealant.
A common mistake during renovation
Quite often, cement or even epoxy grout is used in corners or around shower drains. This is the wrong decision, since these materials are rigid and do not compensate for structural deformations. As a result, the joint may crack or lose its tightness.
Using an elastic silicone sealant allows you to maintain the waterproofness and durability of the joints, especially in wet rooms.
Conclusion
A grout is not just a “residue” between tiles. This is an important part of the cladding, which affects the durability, appearance and functionality of the coating. The right choice and competent application are the key to a perfect result for many years.